Waveform Styles
The AWG has several pre-stored waveform styles that you can configure with specific parameters.
Waveforms can be created by chosing a previously saved waveform or entering a waveform code and relavent parameters.
Drop-down List
The drop-down list is a convenient way to recall pre-stored waveforms.
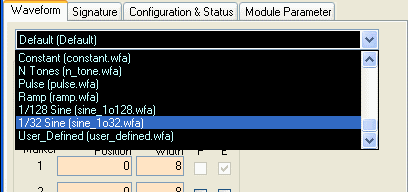
To select a waveform, click on the Waveform tab of the GUI application. Near the upper left corner of this waveform panel is a drop-down list containing a list of pre-stored waveforms. Each pre-stored waveform has its own adjustable parameters. You can edit those parameters in the waveform panel, and you can also save the parameters for use in future sessions. Please refer to the Waveform Codes section below for information on the different waveform styles and their corresponding parameters.
Another way to access the list of pre-stored waveform styles is to double click the box to the right of the waveform code text box. A "Built-in Waveform Selection" window should appear. Click on the drop-down list to select a waveform style.

Waveform code
Each waveform code is associated with a waveform style. Entering the waveform code is a fast way to recall the waveform style you want.
Entering Waveform Codes
The waveform code text box is located at the top of the Common parameters section in the Waveform panel. Before entering in a code, you should first choose any waveform from the drop-down list. This step initializes some parameters for the GUI. You do not need to download that waveform.
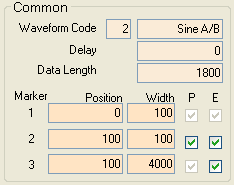
Enter a number from the table below to choose a waveform style. Alternatively, you can double-click in the waveform style box to the right of the waveform code box (where it says "Sine A/B" in the above image) and choose the waveform style from a pop-up list.
| Waveform Code | Waveform Style | Waveform Specific Parameters |
| 1 | Sine | Frequency (Hz) |
| 2 | Sine A/B |
A=numerator, B=denominator, (unsigned integers) A/B is a fraction of the clock frequency |
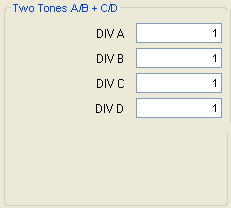
| 3 | Two Tones |
A=numerator, B=denominator, (unsigned integers) A/B is a fraction of the clock frequency for tone1 C=numerator, D=denominator, (unsigned integers) C/D is a fraction of the clock frequency for tone2 |
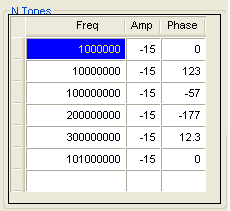
| 4 | N Tones | Frequency, Amplitude (dBc) relative to full scale, Phase (degrees) |
| 21 |
Chirp (Phase Coherent) |
Fstart=Start Frequency, Fstop=Stop Frequency T1=Time until Fstart, T2=Time until Fstop |
| 22 |
Chirp (Phase Continuous) |
Fstart=Start Frequency, Fstop=Stop Frequency T1=Time until Fstart, T2=Time until Fstop |
| 31 | Ramp | A=numerator, B=denominator, (unsigned integers) |
| 50 | Pulse | Tini=Start time, Tr=Rise time, T=Pulse Width, Tf=Fall time, Amp=Amplitude [hex] |
| 100 | PNS Pseudo Noise |
Order (unsigned integers) absolute value, Seed [hex], Tr = Rise time, Tf = Fall time, To = Delay until starting (unsigned integer number of samples), Amp = Amplitude (decimal, where full-scale = 1) |
| 101 | Constant | Value [hex] (unsigned integers) absolute value |
| 256 | User Defined | .uda user defined waveform file |
| 257 | User Defined Stream | .udas user defined waveform binary stream file |
Waveform Code
is the index that the operating system uses to identify the waveform style.Waveform Style
will headline the waveform-specific parameters and will help you identify the waveform. It appears to the right of the waveform code. If you double-click in this box, you can select the waveform style from a pop-up list instead of entering a waveform code.Waveform Specific Parameters
After you have entered a valid waveform code, style-specific parameters
will appear below the common parameters section. Here you may change the specific parameters
(detailed below) to your desired settings.
Waveform Specific Parameters
The AWG module has various waveform styles available, each with its own waveform parameters. This section describes the pre-stored waveforms and their associated parameters.
Sine
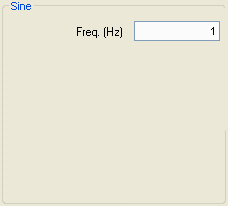
The Freq frequency is the only specific parameter for the sine waveform style. Enter the desired numeric frequency in Hertz (Hz). For example, to output a 1 MHz sine wave, enter 1000000. Note that this is an absolute frequency based on the clock frequency you specify in the Signature panel. If the clock frequency you specify does not match your actual input clock frequency, then the output sine wave frequency will not correspond to the frequency entered here.
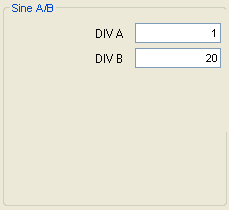
Sine A/B
This sine wave frequency is the sampling frequency scaled by the ratio A/B.
The numerator, A, and the denominator, B, must be nonzero unsigned hexadecimal integers.
Two Tones and N Tones
The multi-tone waveform style can be configured to have a different amplitude and phase for each frequency tone. Two closely spaced tones be can useful for testing the ability of an active circuit to reject 3rd harmonic interference.
Each row in the table corresponds to one tone. For each desired tone, enter in one row:
- the frequency in Hertz (Hz)
- the power amplitude in dB, relative to full scale
- the phase in degrees
Please be aware that when the amplitudes of each waveform (each tone) add constructively, the instantaneous amplitude of the envelope waveform (the n tones) may exceed the full scale amplitude. When this occurs, the overflow data will be truncated.
To illustrate, consider the case of two tones, each with power amplitude set to ‑3 dB. Their peak voltages would be 1/sqrt(2),or about 0.7 of the full scale. When added constructively, the peak voltage is 1.4 times the full scale. When the instantaneous voltage exceeds the full scale, the data wraps around back to 0. Other ways to think of it are that the overflow data is ignored or that the data is modulo full scale. The remedy in this two-tone case is to set the power amplitude of each tone lower than -6 dB, relative to full scale.
The example My 2 Tones has two tones at 567 and 568 MHz with equal amplitude and different phase.
The example My N Tones has 6 tones between 1 MHz and 100 MHz, with various amplitudes and phases, and uses raised cosine (Hanning) windowing.
Chirp
The chirp waveform can be defined with user defined parameters. The module has phase coherent chirp and phase continuous chirp as pre-stored waveforms. There are four parameters that define this waveform style: Fstart, Fstop, T1, and T2.
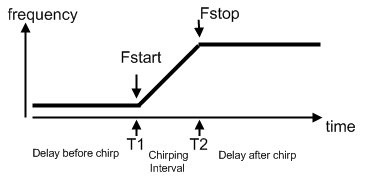
You must define the start and stop frequencies of the chirp, which are the Fstart and Fstop parameters, respectively. These two values will determine the minimum and maximum frequencies of your chirp. The start and stop frequencies must be defined as scalar ratios of your sampling frequency in decimal format. You should limit the chirping within the Nyquist frequency. Therefore, for Chirp Phase Continuous, Fstart and Fstop should be less than 0.5, and. for Chirp Phase Coherent, Fstart and Fstop should be small enough that Fstop+(Fstop-Fstart) < 0.5.
In addition to defining the start and stop frequencies of this waveform, you can define two time interval parameters. "T1" sets the delay time before the chirp begins, and "T2" sets the ending time of the chirp. These values should be in integer format and should not exceed the data length.
The frequency parameters are both defined relative to the sampling frequency.The "T" parameters are the actual number of discrete data values for each interval, corresponding to one clock cycle per data value. For instance, if your sampling frequency were 1 GHz, then each data value would correspond to 1 ns.
As an example, we will use the default values for the chirp waveform styles below. Please note that setting T1 and T2 to 0 will result in chirping for the entire data length.

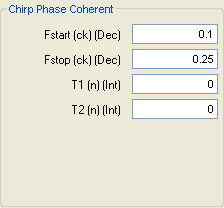
If these phase continuous chirp parameters were used with a 4 GHz sampling frequency (4 Gsps output sampling rate), then the start frequency would be 400 MHz (0.1*4000MHz), and the stop frequency would be 1 GHz (0.25*4000MHz). Setting 0 for T1 and T2 results chirping for the entire data length.
The maximum sampling frequencies corresponding to the modules are:
2 GHz AWG272 (with 2 GHz input clock)
4 GHz AWG452/472 (with 4 GHz input clock)
8 GHz AWG801/872 (with 4 GHz input clock)
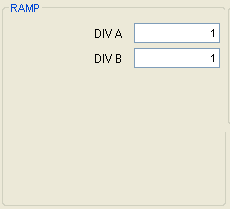
Ramp
The module produces a ramp by multiplying the data point index by the A/B slope factor and the amplitude resolution of the DAC, which is 4096 for the AWG272 and AWG452 and which is 2048 for the AWG801. If you want a ramp with a high slope then you should set the ratio A/B greater than 1. If you want a ramp with a low slope then you should set the ratio A/B less than 1.
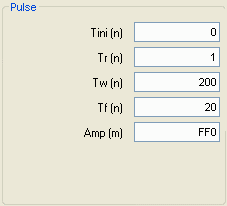
Pulse
The pulse is a time-domain trapezoid defined by 5 parameters: the start time (Tini), rise time (Tr), pulse width (Tw), fall time (Tf), and amplitude (Amp). These parameters are relative to the input clock and are represented in hexadecimal unsigned integers.
The T parameters are defined as discrete data points "n" relative to the AWG. Each clock cycle corresponds to one data point. For instance, if your clock is at 1 GHz and you want a pulse width that spans 20 nanoseconds, then you should enter 14 in the "Tw" field.
The "Amp" parameter is defined as the DAC amplitude. The AWG272/452/472 have 12-bit amplitude resolution, corresponding to a full scale hexadecimal value of FFF, but you should not exceed FD0; for the AWG801/872, full-scale is 7FF, and you should not exceed 7E0. Remember to define these parameters in hexadecimal.
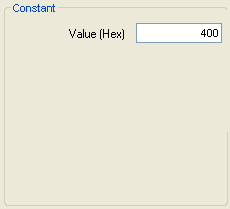
Constant
The AWG produces a constant value waveform. The Value parameter should be a hexadecimal integer in the range from 0 to about 98% of full-scale.
Full-scale is FFF, and you should not exceed FD0; for the AWG801/872, full-scale is 7FF, and you should not exceed 7E0.
For example, if you were to enter an amplitude of 400, then the output should be about 1/4th of the full scale amplitude.
User Defined
The user defined waveform style is a custom waveform loaded from a (.uda) user generated waveform file. Please ensure that the Data Length is at least as long as your waveform data.
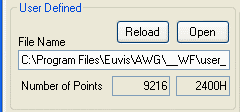
If your .uda file is located in a different directory, you should specify the location by clicking the Open button in the User Defined parameters section.
The next time you wish to download this waveform again, simply enter the waveform code 256 for User Defined Waveform, click the Open button in the User Defined parameters section, and browse to the desired .uda file.
User Defined Stream
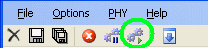
The user defined stream file is a feature to increase the speed of downloading long waveforms you frequently use.
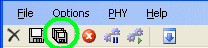
First configure the waveform you wish to download. Then click on the rightmost button
in the toolbar, below the Help menu.
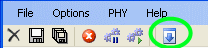
This will generate a file named AWGyyy_SN0xx_<waveform_name>.udas
in your program directory, where AWGyyy is the model of AWG you are using and xx
is its serial number. You should rename and move the file to your waveform directory.
The next time you wish to download this waveform again, simply enter the waveform code 257 for User Defined Stream, click the Open button in the User Defined parameters section and browse to the desired .udas file.
Download the waveform
Check that the Data Length is long enough for your waveform. Please see the Data Length page for details.
Finally, click the "Download" button to download the waveform to the board,
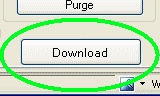
and press "Restart" in the toolbar or in the right-click menu to output the new waveform.
Saving your waveform
You may save the waveform with all of the current parameters by clicking the Save As button. A new dialog box will appear, where you can edit the names and parameters before you save the waveform. For more details on saving process go to the Save Waveform page.