Master Mode
The module can be configured as a Master module to activate other modules configured as Slave modules. By default, the module is in Master mode. To configure the module in Slave mode, the Master property can be turned off via the GUI or the API-based applications.
In Master mode, a few more options are available to you. You now have the ability to control the number of waveforms that are output (see Burst Mode) as well when to start ouputting waveforms (see Triggered Free Run Mode).
In Master mode, you can also synchronize the module with one or more Slave modules in multi-board operation.
Besides the usual CKIP, OUTP and OUTN connections, you can now connect to the input TRIG connector and the board can output signals from the SYNCOUT connector. As a master, after receiving the trigger signal, the module generates a SYNCO signal, which can be used to activate any slave modules.
Master Mode Operation Example:
» Power up the AWG board by turning on the power supplies. Remember that you should install them in the right order as specified in the Hardware Setup page. Connect the clock source, set to the appropriate operation ratings for the AWG module, to CKIP on the AWG module. When the module powers up, you should see the power-up waveform displayed in the oscilloscope with the corresponding spectrum in the analyzer.
» Open the AWG application. Upon loading, the board will stop producing the power-up waveform.
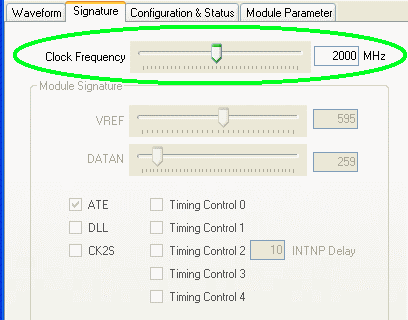
» Adjust the clock in the Signature
panel. For our example, we have set the clock to 2.0 GHz since our clock input is
at 2.0 GHz.
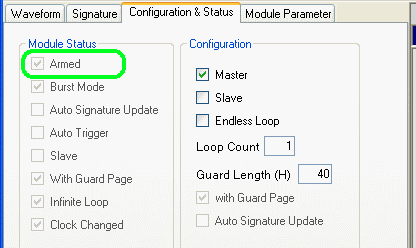
» Click on the "Configuration & Status" tab to go to that window. Change the configuration so that only
Master is checked. Enter a value for Loop Count. Here
we used 3, instructing the module to produce 3 sets of the waveform after a trigger
signal. After the 3rd waveform, the board will not output anything while it awaits
another trigger signal.
For an explanation of these parameters, please see the Internal States section of the Configuration & Status page.

Armed - after outputting the waveforms, the AWG board will automatically
return to the
"Armed" state and will wait for the next trigger signal. To set this,
click on the Arm & Ready button.
For an explanation of the Armed state, please
see the Armed section of the Internal States
page.
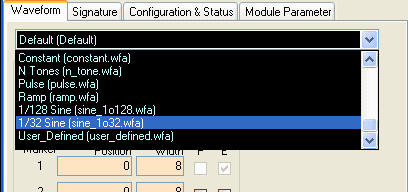
» Click on the "Waveform" tab to go to that window. Click on the drop-down list and click on the "1/32 Sine (sine_1o32.wfa)" waveform. Note that the number of
periods of sine in this waveform will depend on the data length.
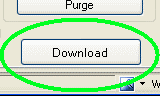
» Press the Download button at the bottom of the waveform panel. Wait a few
seconds for the waveform data to finish downloading to the board. Then press the
Restart button.
The waveform, a Sine wave at 1/32ths of the clock frequency, should begin to be output, and you should already be able to see the output in the oscilloscope and the spectrum analyzer.
Note that DIV B is "20," which is the hexadecimal representation for decimal 32.
» We are going to change the waveform to a Sine wave at 1/128ths of the clock frequency.
» Change DIV B to "80", which is the hexadecimal equivalent of decimal 128.
» Now click on Download Waveform.
» You will notice from the oscilloscope and analyzer displays that the outputs have not started yet. This is because
the board has not been triggered yet. If you go to the "Configuration & Status" panel and click on Update Status
you will notice that the Armed box is checked. This means that the board is
in the Armed state and is awaiting a trigger signal to begin waveform output.
» At this point you must either provide an external trigger signal or
turn on the internal trigger. The external
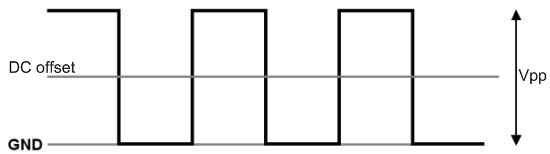
trigger signal used in lab testing was a 1 kHz 1.6 V peak-to-peak square wave with a DC offset of 0.8 V (assuming a 50 ohm load).
You should use a similar signal
for your trigger. The frequency of the trigger, of course, is up to you.
» Once the board receives the trigger signal, the outputs on the oscilloscope and analyzer will change. In the oscilloscope, you will see that the Sine wave frequency
has slowed to one quarter of the previous frequency. In the spectrum analyzer, the frequency should have shifted
to one quarter of the previous frequency. Also, the
waveform will appear in a burst of 3, where one waveform consists of several periods
of a sine wave. The length of this waveform depends on the data length.
» The MARKER signal is output every time a waveform is output. In
our current setup, we have set Loop Count to 3 waveforms, so there should
be 3 signal pulses for the MARKER signal.
» If you connect SYNCOUT to an oscilloscope you can view its signal. The SYNCO signal (the signal that is output from the SYNCOUT connector) is the signal that the board normally sends out to Slave boards in multi-board operation. To see the SYNCO signal more clearly, make the second box to the right of SYNCO "FF" and then click on the Restart button.