Markers
Markers can help you determine if the output waveform is correct. We have provided three markers accesible from the MARKER1, MARKER2,
and MARKER3 SMA connectors on the back panel of the AWG.
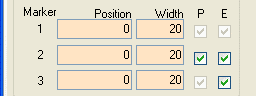
The marker settings are in the Waveform panel, just below the Data Length box.

Position specifies the data point at which to start the marker. Width specifies the number of data points for which marker will be active. The position
and width
are fully customizable forthe default waveforms. User-defined waveforms
can customize the markers further as discussed in the User Defined Waveforms page.
The "P" polarity checkbox is only available for Markers 2 and 3, and it allows you
to toggle active-high or active-low marker signals (for checked and unchecked respectively).
The "E" enable checkbox is only available for Markers 2 and 3, and it is used for
enabling themarker outputs.
Marker 1 is 1.8 V TTL (rail-to-rail) logic level while Marker 2 and Marker 3 are both 3.3 V LVTTL (rail-to-rail) logic level. Marker 1 has less delay than either Marker 2 or
Marker 3. For details about the three available
markers, please see the Parameters page of the Operation Details section.