Master Mode -
In Master mode, a few more options are available to you. You now have the ability to control the number of waveforms that are output as well as how often you would like the waveforms to restart. Besides the usual DDSCK, DDSOP and DDSON connections, you can now connect input to the TRIG connector and the board can output signals from the SYNCOUT and MARKER connectors.
Master Mode Operation Example:
» Power up the DSM board by turning on the power supplies. Remember that you should turn them on in the right order as specified in the Hardware Setup page. When the board powers up, you should see the demo waveform displayed in the oscilloscope with the corresponding spectrum in the analyzer.
» Open the DSM application. Upon loading, the board will stop producing the demo waveform.
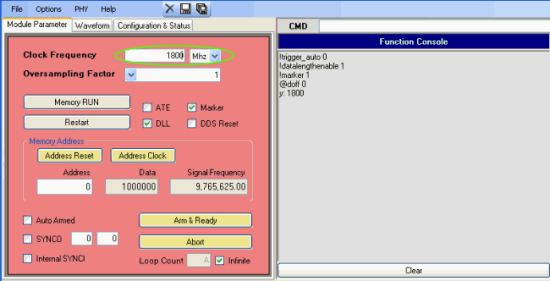
» Adjust the clock in the "Module Parameters" window. For our example, we have set the clock to 1.8 Ghz since our clock
input is at 1.8 GHz.
» Click on the "Configuration & Status" tab to go to that window. Change the configuration so that only
Master is checked.

» Click on the "Module Parameters" tab to bring up the window. Make sure that Auto Armed,
Internal SYNCI, and SYNCO are all checked. Also, you will notice that Loop Count
is set to "A" (decimal 10). For an explanation of these parameters, please
see the Internal States section in the Module Parameters page.

Auto Armed - since this is enabled, after outputting the waveforms, the DSM board will automatically go back to the
"Armed" state and will wait for the next trigger signal. If this was disabled, then the board would go into the "Disarmed" state and
the user would need to manually arm the board by clicking on the Arm & Ready button.
SYNCO - when the box is checked, the board will output the SYNCO signal which is normally used to control a
Slave board but the user can ultimately decide what it will be used for. The value in the first box to the right of SYNCO is
TSYNC1 which is the delay time between the falling signal of the trigger and the falling signal of the SYNCO.
The value in the second box to the right of SYNCO is TSYNC2 which is the amount of time for SYNCO to stay low
before going back to high. You can change the TSYNC2 value to "FF" to see it clearly in an oscilloscope.
Internal SYNCI - normally you would want this box checked at all times when in Master or Standalone Mode. Waveform
output is controlled by the SYNCI signal which in turn is controlled by the SYNCO signal. To have the SYNCI
signal exactly mirror the SYNCO signal you will want to have this box checked. Otherwise, if the box was not checked, then the
board only commences waveform output if it receives a falling signal from the SYNCIN connector on the board or if there was no signal
from SYNCIN then the board will automatically induce a falling SYNCI signal after the TSYNC2 time.
Loop Count - the value in the box specifies the number of waveforms to output after a trigger signal. Since we have it
set at "A" (decimal 10), then the board will produce 10 chirps after a trigger signal. After the 10th chirp the board will not output
anything and waits for another trigger signal.
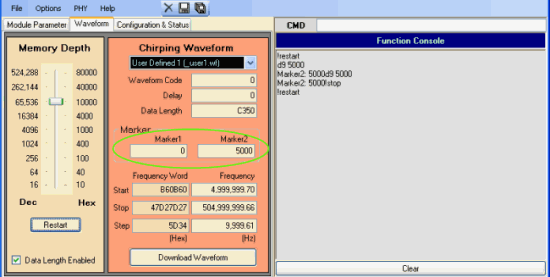
» Click on the "Waveform" tab to go to that window. Click on the drop-down box and click on the "User Defined 1" waveform.

» The "User Defined 1" waveform parameters will load.

» We are going to change the waveform. We want to chirp from 5 Mhz to 505 Mhz in 10 KHz steps. There are 50,000 steps in
this chirp so we will set Data Length to "C350" which is equal to decimal 50,000.
Also we will set the Memory Depth to "65,536/10000" so that it is above the Data Length.
For Frequency we enter 5,000,000, 505,000,000, and 10,000 for Start frequency,
Stop frequency, and Step frequency respectively.
The program will change the values slightly to the real frequencies that it will output.

» Now click on Download Waveform.

» You will notice from the oscilloscope and analzyer displays that the outputs have not changed yet. This is because
the board has not been triggered yet. If you go to the "Configuration & Status" window and click on Update Status
you will notice that the Auto Armed and Armed boxes are checked. This means that the board is
in the Armed state and is awaiting a trigger signal to begin waveform output.

» At this point you will either need to provide a trigger signal or you can press the TRIG button on the DSM board. The
trigger signal we used in our lab was a 1 kHz 1 V peak-to-peak square wave with a DC offset of 0.5 V. You should use a similar signal
for your trigger. The frequency of the trigger of course is up to you.

» Once the board receives the trigger signal, the outputs on the oscilloscope and analyzer will change.
You probably will not see much in the oscilloscope but you can verify that there is a frequency plateau from from 5 Mhz
to 505 Mhz in the spectrum analyzer.
» If you hook SYNCOUT and MARKER to an oscilloscope you can view their signals. The SYNCO signal (the signal that is output
from the SYNCOUT connector) is the signal that the board normally sends out to Slave boards in multi-board operation. To see the
SYNCO signal more clearly, make the second box to the right of SYNCO "FF" and then click on the Restart
button.

» The MARKER signal is output every time a waveform is output. So for our current setup, we have 10 waveforms so
there should be 10 signal drops for the MARKER signal. To see the MARKER signal more clearly, click on the "Waveform" tab
and change the Marker1 and Marker2 values to "0" and "5000" respectively. Note that these values are
in hexadecimal so in decimal they are 0 and 20,480. This will cause the DSM to drop the Marker signal for 20481 (hex memory address 0
to hex memory address 5000) which is equivalent to about 45.5 microseconds at 1.8 GHz.
» If you go to the "Configuration & Status" window and click on Update Status repeatedly, you will notice
the board in various states of operation.
